|
SCHEMATIC
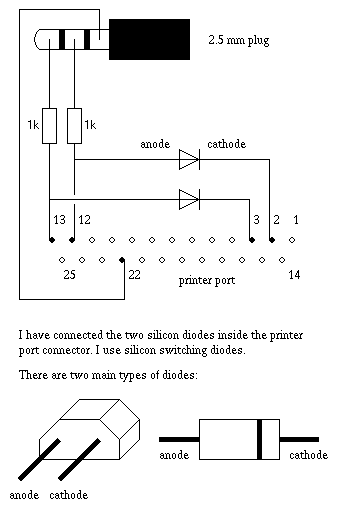
(The resistors are optional. In some cases they have been found to reduce the
chances of transmission problems.)
SOFTWARE YOU WILL NEED
Use this DOS testing software to verify that your cable is functioning
correctly.
 Link test software for the parallel link
Before deciding to buy or build a parallel link, it's a good idea to check out
our chart of linking software and make sure there's a program compatible with
your operating system and calculator.
» Linking Software
PARTS LIST
- A male 25-pin D type connector (to plug into the parallel port) to which
you can solder the wires.
- A plastic cover to fit around the D connector.
- Two diodes, of type 1N4148 (small silicon switching diodes). The choice
of diode type is quite important to the success of your link.
- Two 1K ohm resistors (optional). The precise value of resistors isn't too
critical - anything from about 500 ohm to say 2.2K ohm works as well. If you
do not include the resistors the link may not work on your computer. (But they
can be left out if you can't be bothered.)
- A piece (1 to 1.5m or so) of thin electrical three-core cable. If you can
get a cable which has two wires and a copper 'screen', which is a bare copper
wire wrapped around the other ones, then get some of this sort instead. Then
you can use the screen as the earth to improve grounding and prevent crosstalk
between the wires. Don't make your cable much longer than about 1.5m,
otherwise you will increase the chance of transmission problems.
- Either: a 2.5mm stereo jack to plug into the calculator;
- Or: a 2.5mm stereo socket instead (recommended to ensure a good
connection with the calculator's port). You then plug the calc-to-calc cable
into the socket and plug the other end into the calculator. This ensures a
perfect connection and is a more robust solution than using a plug - plugging
and unplugging can damage fragile soldering;
- Or: since some people have had difficulty obtaining 2.5mm sockets
or plugs, your other option is to cut your calc-to-calc cable in half to use
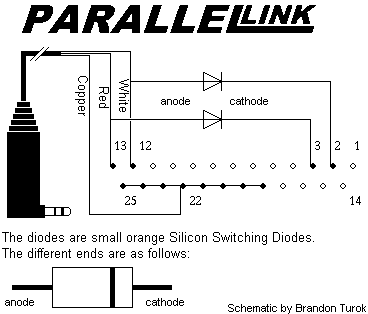
the 2.5mm plug from one end. If you choose to do so, then you will find that
the tip of the 2.5mm plug is the red wire, the middle ring on the plug is the
white wire, and the other (copper) wire is the ring nearest the base. See an
alternative
schematic illustrating these modifications. If you don't want to
sacrifice your calc-to-calc cable, you could attach a readily-available 3.5mm
socket to one cut half of the calc-to-calc cable and a 3.5mm plug to the other.
Make sure both the socket and plug are stereo. Your calc-to-calc cable will
still work (make sure you get the connections right - use a test meter) and you
can use one half to connect to your computer link via another 3.5mm plug
and socket.
TOOLS YOU WILL NEED
- Soldering iron - it's also useful to get a clamp thing if you can find one
to act as a second pair of hands.
- Test meter - to test all the connections. Also needed to work out which
part of the 2.5mm stereo jack connects to which connector on the back of it.
Multimeters can act as test meters.
- Wire strippers
- Pliers
- A screw driver
INSTRUCTIONS
- Print out the schematic: this will make it a lot easier to work
with. There are two ends to the link - the calculator end and the
computer end. You can make either end first it doesn't matter.
It's probably neatest to connect the diodes at the computer end (and
that's what I've used here), but wehave seen links with the diodes at
the calculator end. Basically, as long as you follow the schematic then
you can do whatever you want.
Calculator end
This is perhaps the most fiddly part of it. You have three options:
either use a plug, a socket, or half your calc-to-calc lead.
Calculator end - Using a plug
Calculator end - Using a socket
- If you want to use a socket then when you use your link you will
use your calc-to-calc lead to go between the socket and the
calculator. The method to follow is the same as above except that to
work out which connector on the back of the socket connects to each
ring on the plug on the far end of the calc-to-calc lead, you need to
plug one end of the calc-to-calc lead into the socket and use the test
meter on this combination. The combination of calc-to-calc lead and
socket functions as a plug. Personally we think that using a socket is
more reliable than using a plug.
Calculator end - Using half your calc-to-calc lead
- In much the same way as above, to check which wire connects to
what ring on the plug, you can use a test meter. You will find that
the tip of the 2.5mm plug is the red wire, the middle ring on the plug
is the white wire, and the other (copper) wire is the ring nearest the
base. This alternative schematic illustrates this. (It also shows the
optional connection of each of the pins between 25 and 18 together (see below),
but does not show the resistors.)
Computer end
- We will connect the diodes and resistors this end and get
everything inside the plastic housing. Investigate how your D
connector attaches to the housing. It may be best to work with one
half of the housing attached to the D connector so you can get
everything the right length. Up to you.
- You can optionally connect each of the pins between pin 25 and pin
18 together. They are all earth. Apparently doing this may slightly
reduce the chance of transmission problems.
- Solder the diodes and resistors, if you're using them, neatly onto
the 25-pin D connector.
As you will need to connect two things to pins 12 and 13 (the diode
leg and the resistor leg) you may find it easier instead to solder the
diodes into the pins first, then solder the resistor legs to the legs
of the diodes. Up to you - it makes no difference electrically. If you
do this then hook the resistor legs round the diode legs to ensure
strong connections.
Obviously make sure you get the diodes the right way round and that
you use the right pins, and make sure nothing touches that shouldn't.
We want everything to fit inside the plastic cover, so cut the legs of
the resistors or diodes a bit if they are going to be too long.
The schematic above is from the point of view of looking into your
computer's port, or looking at the back of your 25 pin connector onto
which you solder the wires, with pin 1 at the top right. In other
words, connect the wires etc as you see them in the schematic.
- Carefully strip the three wires in the cable to the required
lengths. Bear in mind that you will want to fit the cover over
everything for neatness so don't strip them too far.
- Solder the correct wire to pin 22 (earth). Use the test meter to
work out which wire you should solder. It will be the one you soldered
earlier to the large connector on the plug (i.e. base ring of the
plug). Make sure you give this wire enough length to work with.
- Now for the other two wires - they attach to the ends of the
resistors. Use the test meter and the schematic to work out which of
the remaining two wires is which. Make sure you connect the correct
wire to the correct resistor. Hook the ends of the wires round the
resisor legs and use a good dollop of solder to make the connections
strong.
- Make sure no bare wires are touching. Put insulation in between
the diode/resistor legs or bare wires if you are worried. Check the
connections.
- Attach the plastic housing and cable grip.
- If you haven't yet done the other end of the cable now's your
chance.
And that's it.
Testing your link
After double checking all your connections, you need to test out your
link using the LinkTest software (see the readme file in the LinkTest zip
file), and hopefully it will work perfectly first time. If it doesn't work, see
our hints.
Good luck. See the link
software page for where to get suitable link software.
HINTS
- Connections
First things first: check and double check that you have got the connections
correct and that no wires are touching that shouldn't. Make sure you get the
pin numbering correct and ensure that no pins have become soldered to each
other by mistake. Check the whole thing with a test meter to check for bad
connections.
- Use the right software
The home-made parallel and serial links require the appropriate software to
make them work. They do not work with Texas Instruments' link software. See
the Linking Software
section.
- Poor contact with calculator port if you use a plug
Some 2.5mm plugs do not fit far enough into the calc's port to make contact
properly because of the circular 'lip' around the port on the calculator's
case. To get around this you can either file away some of the metal from
around the base of your plug, or you can carefully scrape away some of
the plastic around the calc's port to let the plug fit in further. One
person's link didn't work until he filed away a bit of the base of his plug.
Also, if you look at the plug itself on some calc-to-calc leads you will see
that it's smooth all the way along. The standard type of 2.5mm plug has a
groove near the tip. The grooved type should connect properly with the
calc's port, however if you are having connection problems consider a socket
instead (see below).
- Use a 2.5mm socket instead
To ensure perfect connection with the calc's port you could use a 2.5mm
socket and then use the lead supplied with your calculator to go
between this socket and the calculator. This is what we would recommend. Just
make sure you get a stereo 2.5mm socket.
- Be careful
Obviously treat your calculator's port (and your computer's port) with respect.
Check your calc's port works by transferring something to another calculator.
- Does Linktest return the correct "should-be" values?
No: If your link does not get the correct 'should be' values with
linktest then one (or both) of your diodes is either the wrong way round,
connected to the wrong pins or simply not working. Alternatively, two wires
could be touching, or your parallel port may be incompatible (see below).
Yes: A common symptom of problems is that you get the correct 'should
be' values with the Linktest program, but your link doesn't work when you want
to transfer something. The Linktest program basically only checks that the
diodes are the correct way round and functioning, no wires are touching that
shouldn't be and that your parallel port works. It does not check whether the
link is making proper with the calculator's port or identify other possible
problems. The real test of whether the link works is whether it can transfer
programs to and from the calculator with no problems. If it can't then try the
hints below. The hints below should comprehensively cover all potential
problems you may be faced with.
- Parallel port incompatibility
Unfortunately some computers have a type of parallel port which is incompatible
with the link.
Links which include the resistors should be less likely to suffer from this
problem. If you did not include the resistors when you built your link then
you should consider doing so. If you have tried the other hints below then
also try your link without resistors.
This incompatibility problem is not necessarily related to the age or speed of
the computer, only to the type of parallel port in use. However, it has been
found that this problem is not as common in older computers (486 or earlier),
presumably because they tend not to have the incompatible type of parallel
port.
Try changing the type of your enhanced parallel port in your bios from ECP or
EPP to something as ordinary and as standard as possible. In many cases this
may have no effect but it's worth trying.
You should also try reducing the speed of your computer by turning off its
turbo switch if it has one or by disabling its secondary cache in your bios.
Or (more practically) you could run a program in DOS such as MoSlo
to slow your computer down.
If your link still doesn't work you should then try using your link on other
computers. If your link works fine on some computers but not on yours then you
should get hold of a different i/o card and use that instead of your parallel
port.
If this is the case we would recommend trying an old i/o card from a 286/386 -
many people have old computers lying around and so they are reasonably easy to
come by. Also, the incompatibility problem is less prevalent in old computers.
Depending on what link software you use you will probably need to disable your
existing parallel port or move it to LPT2 in your bios. Make sure you get
details of the dip switch settings that the card uses. If possible, test the
link with the card before you install it on your computer. You could
use a new parallel port card, but if at all possible you should test it before
you pay for it.
The problem of parallel port incompatibility affects some people - a link works
fine on some computers but not on others. It would get the correct "should-be"
values, but nothing else would work. Try getting hold of an old 8 bit i/o
card, installing it and disabling the original parallel port in the bios. This
has been known to make the link work!
- Type of diode used
The type of diode you use is pretty important. You should use small silicon
signal switching diodes: other ones cannot switch at the required rate, and so
your link won't work. A suitable type of diodes is 1N4148.
- Use LPT1 with Link85xp
The standard link software for the parallel link (Link85xp) does not work with
IRQ's, but instead it uses the address of your parallel port. It takes the
address of your parallel port from the bios of your computer. It will only use
LPT 1, despite the options on the system setup screen, so if you want to use
LPT 2 with it then tough. If this is the case then either use LPT 1 or disable
your LPT1 in the bios and it should work. This is what we had to do after
installing a second parallel port on an old i/o card.
Another qwirk of Link85xp is that when transferring files to the calc you can
only transfer *.85g and *.85b files - so if for example you want to transfer
*.85s files you'll have to rename their extensions to *.85g.
- Crosstalk
With parallel links crosstalk between the wires in the cable can be a problem.
To combat the problem you need to make sure your link is well earthed. If the
lead you are using has a copper 'screen' as one of its wires (bare copper
wrapped round the other wires) then you should use this as the earth. If your
cable does not have a copper screen then consider using one that does. For the
parallel link, earth is pin 22. If you are using a 25 wire printer lead
instead of a three wire cable then you can improve earthing by soldering a few
of the spare wires to pin 22. You should also not make your link longer than
about a metre or so.
- Try it in plain DOS
Some people have experienced problems with their links under Windows 95.
Although using Windows 95 should not affect the situation (and doesn't in most
cases), if your link doesn't work then it's worth trying it in plain DOS mode
after a clean boot.
- Connect pins 25 to 18 together
Although optional, you can connect each of the pins between 25 and 18 together
(see alternative schematic).
Apparently doing this can slightly reduce the chance of transmission problems.
Pins 25 to 18 are all earth.
- Try another calculator
The TI-85 and the other TI calcs use a simple resistor-capacitor arrangement to
determine their speed. These components will not be precisely the same value in
all calcs so some calcs will be faster than others. You could find that your
link works with some calculators but not all. If so then you should try some
different diodes in your link or try to reduce crosstalk (see above).
It is also possible (though unlikely) that your calc's port is not functioning
- you should check it works by transferring something to another calc with the
calc-to-calc lead.
- Link still not working?
You should look at the
Parallel
Link FAQ at Andreas Westfeld's site for other hints.
|