Here is the page that is currently down. I'm having tons of trouble with
GeoCities when I try to upload new files.
The SPinTerface Cartridge Page
How to build SPinTerface cartriges...
If after reading this you wish you could have a particular device on
your 85, then you really ought to have a SPinTerface port
installed on your TI-85. If you don't have one yet, and you feel you
need it and have the expertice to install it, then I recomend
the instalation.
The SPinTerface is a 10-pin port that has a serial interface and a 5v+
regulated power supply. Its design automaticly turns off
the voltage regulator to save power when nothing is connected. It also
makes sure all the pins are connected before power
comes on and it turns off all power before the device is disconnected. I
have used it to connect speakers, and memory
expansion, and if anyone wants to get into it, they could create all
kinds of other devices to it also!
Speakers are pretty simple. There have been speakers designed for the
link port, but one could be made into an all in one case
that wouldn't need an expensive 2.5" plug. You can connect it directly
to the SPinTerface's serial port, or even use the power
supply to run a tiny amplifier!
I won't go into too many details with some things. I want people to
design their own things! It will promote creativity and it will
mean devices do exactly what you want. I will however, show how to
connect the NM29A080/040V chips (used in the SF
Expander) to the SPinTerface port. I'll also tell you how to build a
super CHEAP speaker cart with a built in amplifier and I'll
show you where you can get really awesome looking cases for your small
one or two chip cartridge projects.
The SF Expander, created by Mel Tsai, was my inspiration for the
SPinTerface port. I loved the simplicity of the SF Expander
when compared to its function, but I didn't want to have to drag another
box around (I already have an 85 and an 82 that I
take EVERYWHERE). My brother had just got a GameBoy Pocket, and I got a
VirtualBoy. I was going to build connectors
for them that would let me use cheap powerpacks with them, rather than
going out and buying a $16.00 custom pack for each
one that can't be used for anything else. I was suddenly inspired! I
didn't want an external device for my TI-85, so maybe I
could build it right into it! It was just like my VirtualBoy. I was
going to build a connector right into it to run off of a standard
powerpack. Why not build a "powerpack" directly into the TI-85. I used a
design compatible with the SF Expander's chip. I
soon discovered that I could run a small LED of this power supply
without even dimming the screen! (NOTE: This depends on
the power the LED requires. Some other projects may need a battery
expander to run without dimming the screen). I realized
at that moment that this thing gives you more power than I had ever
realized, and that its potential went far beyond memory
expansion!
I will first show you how to build a very, very nice looking case for
small projects.
The illustration above shows what the case and its components look like.
Those plastic pieces are VirtualBoy gamepack
covers, and Nintendo GIVES them out for FREE!!! I'm going to get a bunch
of these things so I have nice little cases for these
things. If you need an order form to send for these FREE gamepack
covers, you can call 1-800-255-3700 Monday-Saturday,
4:00am-12:00, Midnight, and Sunday, 6:00am-7:00pm, Pacific time to get
one.
If you need a bigger case, you can just glue two of these covers
together. I think it may be able to hold 3 small chips, such as
the memory chips I mentioned before. If you just need room for one chip
(This is what you'd use for the SF Expander
cartridge) you can cut one in half and glue them together as shown, and
put the plug on the end or the side of it. I like how it
looks with the plug on the end, but it might get in the way, especialy
when you play video games. If you do build the
SPinTerface, see if you can't build the port to come out from the bottom
rather than the side. If you don't think you can work in
that small space, you can create low profile cartridges by putting the
connector on the side rather than the end. If you don't
want it to be full lenth, you can just cut them to a good lenth and
super glue the four pieces together.
The connector is the most important part that will be visible. The
illustration shows that you need to cut the pin with no
connection completely off (or heat it with a soldering iron and pull it
out with a pliers) and that the two pins in the middle row
need to be cut about 2mm off the tips. The reason for the short middle
pins is so the power (activated by these pins) won't
come on till all the other pins are connected. The power then is also
shut off before any other pin is disconnected as you
remove a cartrige. This is only nescesary for cartridges that require
power. Some may not require power (non amplified
speaker, etc.) and you don't need to worry about the middle pins. If the
project is powered however, you should cut the pins
to their shorter lenth and then you mustsolder those two pins together,
inside the cart. What you get is one of the very few types
of cartridges that you CAN insert and remove without having to shut
anything off. It's all automatic and it's all hot swapable!
The Connector. _____________________________________________
\ ________________________ |
/ | | |
\(bottom of calc) |5v Gnd Power NC Data| |
/ |5v Gnd Batt+ Gnd Clock| |
\ |________________________| |
/____________________________________________|
The SF Expander cartridge uses the 10-pin plug, a .1�f ceramic disk
capacitor, a 2.2K resistor, and an NM29A080/040 chip.
The chip is a hard to find part. They are nolonger made. It is still
possible to find them, but the only way is to find someone who
is interested in selling one they have. I am working on a simple
serial/parralel interface that would work just like the SF
Expander did, but the interface converter would use parallel chips
instead of serial chips. This PF Expander, if It becomes a
successful project, would be a solution for those who don't want to
build a PIC or microcontroler based expander. It would
have all of the SF Expander's limitations, but it would be something the
average electronics hobbyist could build. IF I finnish,
I'will post it here!
First off, you will need to have the connector made, as described above.
Also, when you solder this thing together, you will
want to be extremely quick and precise, because you do NOT want to
overheat the chip. There is a something important
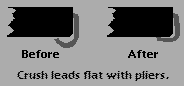
you must read before you go on!!! The PLCC Chip case that is used for
the NM29A080/040 chips needs modification to
fit into the virtual boy gamepack cover case that you should have built.
The chip itself fits, but the leads prevent it from going in
easily. You can take a pliers and flatten the rounded lead bottoms. If
you like, you can even snip off all the leads that aren't
used and flatten the ones that are left, but you MUST BE CAREFUL!!! If
you slip, you could break off an important lead!
If you can find it, get the SOIC(?) version. It's very thin. They will
be harder to find. Most are the PLCC type. It realy doesn't
matter which chip you get since both will work and both can be made to
fit into the cases. Also, I would recomend tinning the
leads of the chip before beginning. This simply means that you put a
thin layer of solder on the lead so you can put the solder on
the wire and bond the wire and the chip almost instantaneously. Only
solder the wires and parts to the sides, and make sure the
wires won't touch and that all the parts can slide in easily. The only
pins used are 1, 4, 5, 6, 7, and 28/32 depending on which
chip you use (Remember, if you want to cut the others off, you can, but
be careful). The circuit is very simple. First, connect the
resistor between pins 6 and 7. Connect a wire from pin 6 to the data pin
(top, right from solder side of connector). Then
connect pins 1 and 4 with a jumper wire. Solder two wires to both ends
of the capacitor and then solder the capacitor to pins 4
and to 28/32 (depends on the chip. 28 or 32 is always the last pin).
Solder the wire on the capacitor that connects to pin 4 to
the ground pins and have ajumper from the ground pins to the signal
ground. The wire on the other side of the capacitor
(connected to pin 28/32) connects to the two 5v+ pins on the connector.
Last is to connect a wire from pin 5 to the clock pin
on the connector. All the wires should be short and you can't fold the
capacitor or the resistor over the chip or it won't fit into
the case. Slide it into the case after you have made sure it works by
testing it. You may want to let a drop or two of super glue
fall into the cartridge to hold the chip down. Then super glue the
connector to the cartridge case. You'll have finnished your SF
Expander cartridge for the SPinTerface port.
Would YOU like your cartridge design here??? E-Mail me if you have a
link project that could be turned into a
SPinTerface project or if you have a SPinTerfacw cartridge designed! I
will put it up here for all people to see. I will give you
full credit for your work and I'll put up your E-mail and your web sites
too!!!
SPinTerface Cartridge Designs...
The SF Expander cartridge was created by me, Richard Piotter. The
electronics design was adapted from
the SF Expander, built by Mel Tsai. The Expander and expander
cartridges provide 512K or 1 Megabyte
storage for the TI-85. Mel has all rights to the software and SF
Expander design however. I only modified the
design to work as a SPinTerface cart.
(Instructions above)
The TI-Memory Expansion Homepage
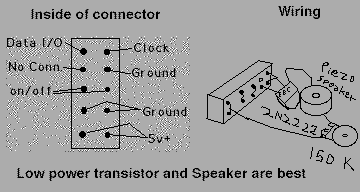
A speaker cart with a built in transistor amplifier, designed by
Richard Piotter, can be built easily
following my design. Get a low power piezo electric speaker, an
NPN transistor like the 2N2222 or the
2N4954, and a very small rotary variable resistor (Radio Shack
has them all). The variable resistor I had just
happened to be a contrast control for a "CRAPIO" personal
organizer. It measured about 150K, but I would
expiriment with different values. The screen dims a little with
mine and I would strongly suggest using the
battery expander with it, since it provides more power, but if
you turn your cotrast up a little, you won't
notice, but remember, it uses plenty of power. I mean, it is an
amplifier, isn't it? As for what programs it works
with... Well, PlainJump][, zPong, Playwav, sound, and more. The
amplifier is designed to take the signals from
the data and clock pins of the SPinTerface port (the labels are
based on the SF Expander cart. It would be
more accurate to say red and white wire connectors, since that is
what they connect if you were going by a
Link cable) and run both of them together, through an amplifying
transistor. The transistor alone drains
massive power and makes the speaker rattle too much, so the
variable resistor acts as both a current limiter
and a volume control. The SPinTerface amplified speaker is easy
to make. Connect the plus side of the
speaker to one of the outside pins of the variable resistor. The
other outside pin and the middle pin can be
joined and then the middle pin connects to the 5v+ terminal on
the connector. Connect the other speaker wire
to the collector of the transistor. the emitter of the transistor
connects to the signal ground, and finaly, join the
clock and data pins and then connect both to the base of the
transistor. The circuit is now complete. Just
make a case now. I made a round hole large enough in the top of
one of those virtual boy gamepack covers
to hold the speaker (same case as the SF Expander cart). I then
made a slot at the end for the volume knob
to fit through. the transistor should slide in tightly, but it
will slide in. I soldered everything together after cutting
the case, but I didn't join the two halves of the case. When I
was don, I glud the speaker and the variable
resistor into place and then put glue on the joint and joined the
two sides of the case together. I then glued the
connector on. Once it is dry, you are done, but make sure your
knob turns freely! Add ing an earphone plug
wouldn't be that difficult. I may put up a plan later for a
speaker cart with stereo earphones, amplifier shutoff,
volume, built in speaker, and a stereo/mono switch, but these
things are easy to add. If you absolutely need a
design, I'll see if I can post it soon.
If you would like to use AA bateries instead of the expensive AAA
bateries, then go to my Battery Expander Page. It has
instructions on building a batery case extender that lets you use AA
batteries with NO MODIFICATION to the actual
calculator. It will work on any TI-8x except the TI-80. It was easy for
me to build it because I have a TI graveyard that's full of
parts, but you should be able to get things done too. You'll figure it
all out once you see it...
Main Navigation Menu--TI Info Page--TI Programing Page--TI Software
Page--TI-82 Turbo Page--TI-81/85 Turbo
Page--SPinTerface Page--Battery Expansion Page--TI Link Page--News,
Updates, & A Little About Me
I have attached two gifs from the page. One is a diagram of the
prototype speaker. The other is a picture showing the PLCC chip and what
needs to be done to make it fit (Like the Expander chip). I'm going to
keep on trying to get my web page fixed, but I don't think the problem
is at my end of the net.
Hope This helps a little. The page is not up completely and this may
help a little.
Richard Piotter
e-mail: richfiles@hotmail.com
home page: <A
HREF="http://www.geocities.com/SiliconValley/Lakes/5081/Richfiles.html">The
Richfiles</A>
____________________
/ _______ \
/ \ __ | \
| | | | | |
| | |__/ / |
| THE RICH \ FILES |
| | |\ \ |
| / \ \ \_ |
\ |___| \___| /
\____________________/
______________________________________________________
Get Your Private, Free Email at http://www.hotmail.com